
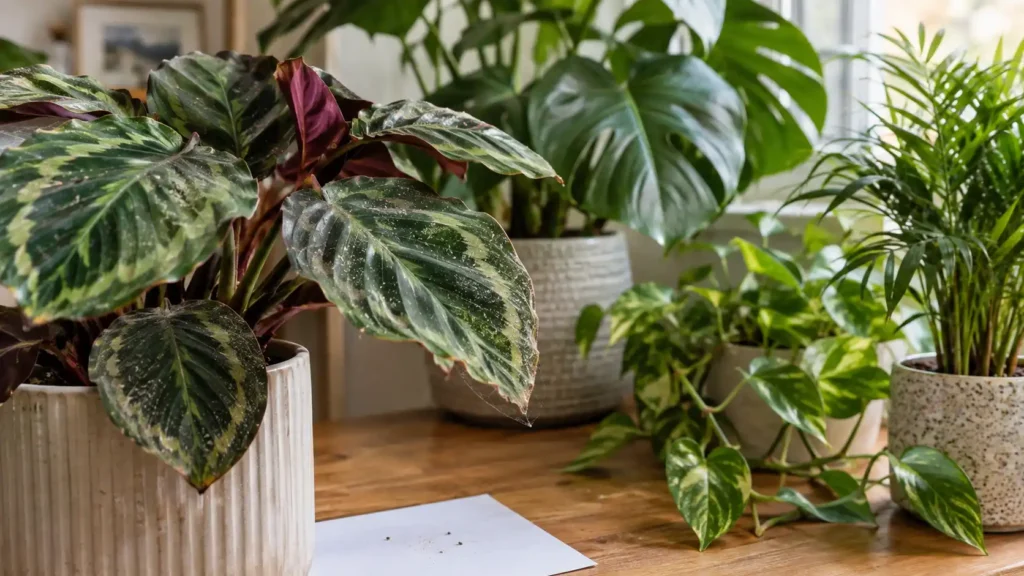
Spider mites on houseplants are tiny sap-feeding arachnids that can turn healthy-looking foliage into a field of pale speckles, bronzed patches and, eventually, fine silk webbing. The fastest way to deal with them is not to reach for a spray immediately: first confirm that the pest really is a spider mite, because thrips, mealybugs and non-pest problems can create superficially similar damage. Once confirmed, the goal is to break the mite’s life cycle rather than rely on one treatment. A practical home programme combines isolation, physical removal and repeated, thoroughly applied treatments spaced around the pest’s rapid development, followed by monitoring until no live mites remain.
Quick Summary
- Fine stippling plus fine webbing strongly points to spider mites, and tapping a suspect leaf over white paper can reveal tiny moving mites.
- One treatment is rarely enough. Under favourable conditions, two-spotted spider mite eggs can hatch in as little as about three days, while the egg-to-adult cycle can take roughly 7–21 days depending on temperature.
- Water is useful for mechanical knockdown, but it should not be confused with a complete eradication programme. Insecticidal soap and appropriately labelled oil products can provide more deliberate control, while forceful water sprays are especially well-established as a tactic for aphids.
- Calatheas, ivy and palms warrant close monitoring; succulents and ZZ plants are generally less troublesome in dry indoor conditions, but no houseplant should be treated as mite-proof.
What You’re Seeing: Recognizing Spider Mite Damage
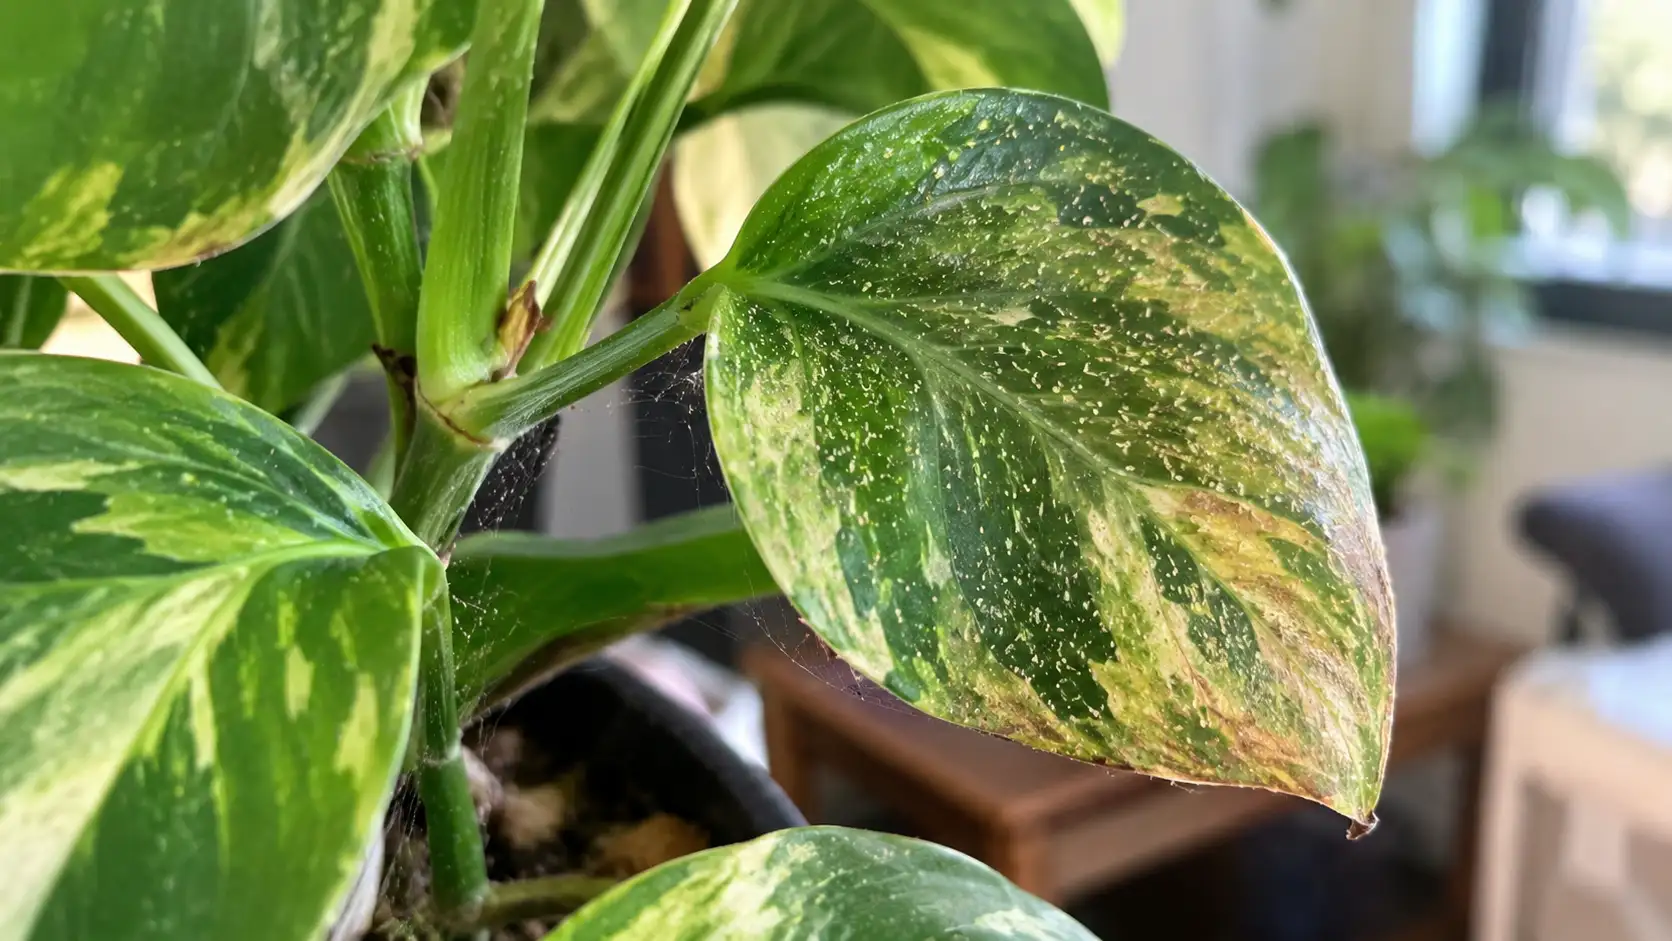
Spider mite damage usually starts as extremely fine pale dots or stippling across the leaf surface. The individual cells have been damaged by the mites’ piercing-sucking feeding, so the leaf does not look chewed; instead, it develops a mottled, speckled appearance. As feeding continues, the foliage can become yellow-green, bronze, tan or brown, and heavily damaged leaves may eventually drop. Fine silk webbing is particularly significant when it appears around leaf undersides, stems, growing points or dense new growth.
A useful diagnostic sequence is:
Stippling → examine undersides → look for fine silk → shake-test for moving mites.
The combination is much more informative than a single yellow or brown leaf. Low humidity and plant stress can increase the likelihood of spider mite problems, but dry-looking foliage on its own is not proof of mites.
For background on keeping foliage clean and making pest inspection easier, see our How to Clean Plant Leaves for Healthy Houseplants.
Fast At-Home Confirmation Test
Place a sheet of white paper underneath a suspect leaf or stem and tap or shake the plant over it. Then watch the paper for tiny moving specks.
Spider mites are very small and may be hard to distinguish directly on a green leaf, but they become easier to notice against a white background. A hand lens can improve the result, especially when the infestation is light. Check the undersides of leaves as well, because spider mites commonly feed there.
Do not treat a plant solely because the paper shows one unidentified speck. Look for a pattern: moving mites plus stippling, and ideally webbing or eggs on the foliage.
Is It Actually Spider Mites? Ruling Out Lookalikes
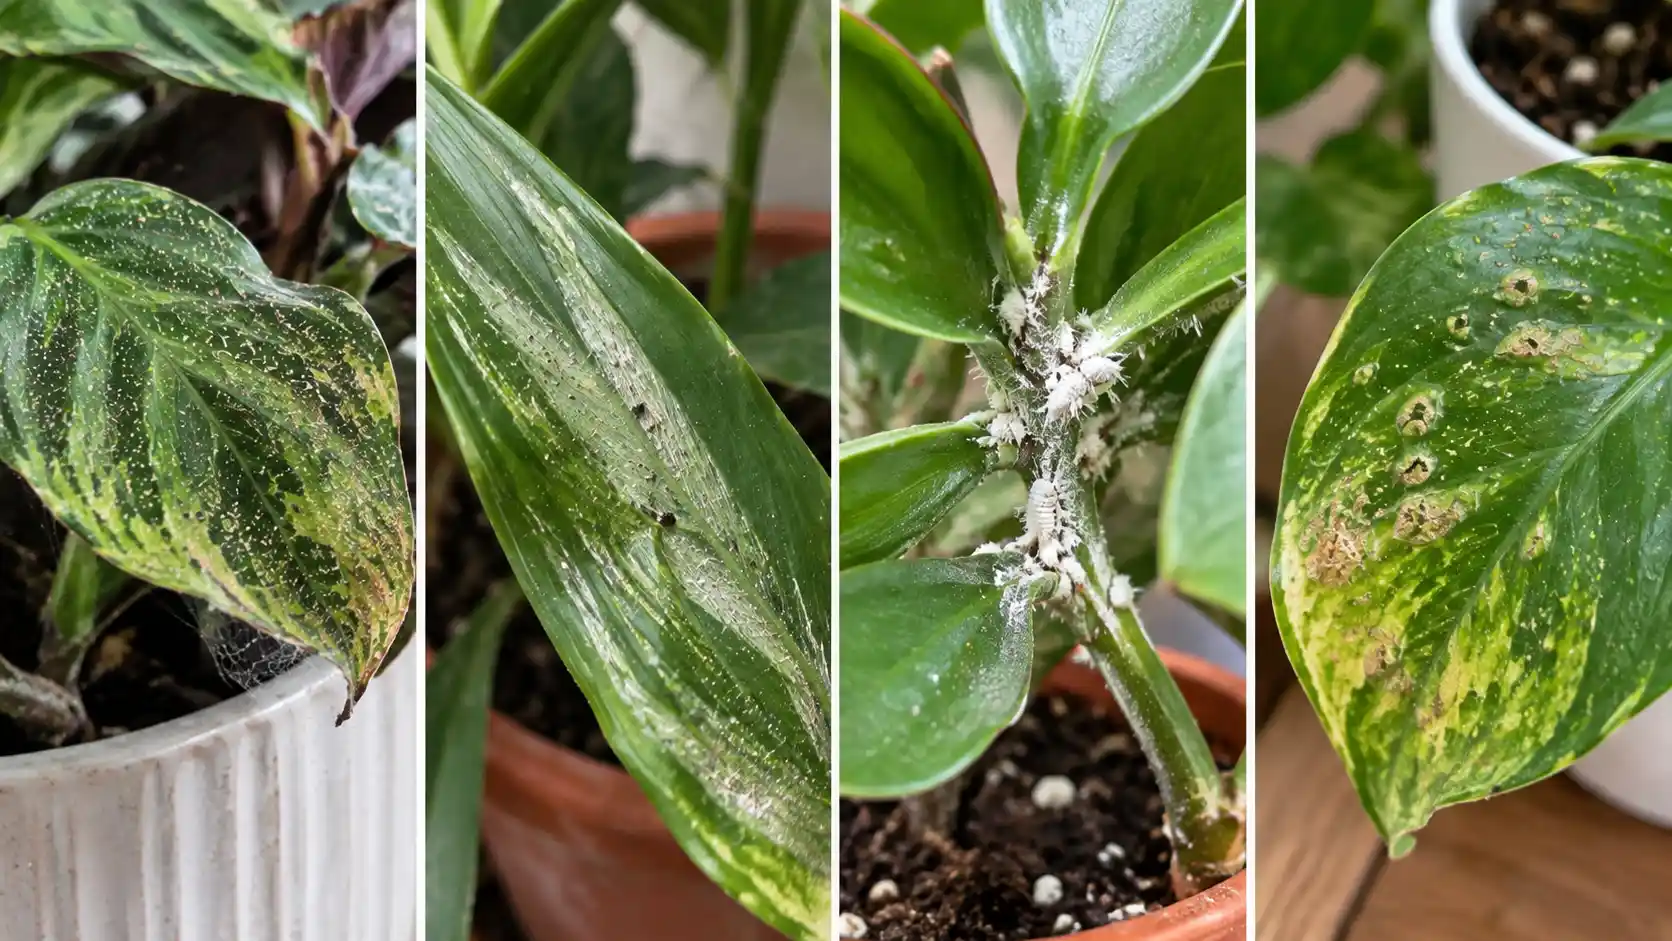
The most useful distinction is to combine where the pest or damage occurs with what the damage looks like. Spider mites are generally associated with fine stippling and, once populations rise, silk webbing. Thrips more commonly produce silvery streaks or splotches and dark droppings, while mealybugs produce conspicuous white cottony material.
Non-pest disorders can be even more deceptive because no insect is present at all. Edema, for example, can create raised blisters or corky patches on leaves and may be mistaken for pest injury.
Spider Mites vs. Thrips vs. Mealybugs vs. Non-Pest Stippling
| Cause | Visual Sign | Location | Webbing? | Fast Test |
| Spider mites | Fine stippling, mottling, bronzing | Often leaf undersides, growing points and stems | Yes — fine silk when populations are high | White-paper shake test for moving mites |
| Thrips | Silvery streaks or irregular silvery patches; dark frass | Leaf surfaces, young growth and flowers | No | Inspect for slender moving insects; blue or yellow sticky traps can help monitor adults |
| Mealybugs | White cottony clusters or waxy filaments | Leaf axils, stems, nodes and undersides | No — the white material is wax, not silk | Usually visible without magnification |
| Non-pest stippling/discoloration | Uniform, patterned or physiological discoloration; may include blisters or corky areas | Depends on disorder; often broader portions of a leaf | No | No live pest found after careful inspection |
Thrips can also be detected by tapping foliage over paper, so the paper test is most useful when interpreted together with the injury pattern.
The two strongest disqualifiers for spider mites are therefore no live mites on careful inspection and damage that does not match the typical stippled/webbing pattern.
Why Spider Mites Show Up on Houseplants
Spider mites are favoured by warm, dry conditions, and indoor environments can create exactly that combination. Heating vents, dry winter air, water stress and dusty foliage can all contribute to conditions in which mite populations establish more easily.
In Australian homes, pay particular attention during periods when indoor heating or air-conditioning creates a dry microclimate around the plant. A pot sitting directly beside a warm vent can experience a very different environment from the rest of the room.
Plant stress matters too. A stressed plant may be less able to tolerate feeding damage, while excessive fertilisation can produce lush, succulent growth that is attractive to some spider mite populations. UConn Extension specifically recommends avoiding over-fertilisation when managing two-spotted spider mites.
Dust is another practical issue. It does not create mites by itself, but dusty leaves make early detection harder and are associated with mite problems in indoor environments. Regular inspection and careful leaf cleaning therefore have a preventive value beyond appearance.
For a more detailed humidity diagnosis, our Houseplant Humidity Chart: Ideal Levels by Plant + Fixes is a useful companion guide.
Which Houseplants Are Most (and Least) Susceptible
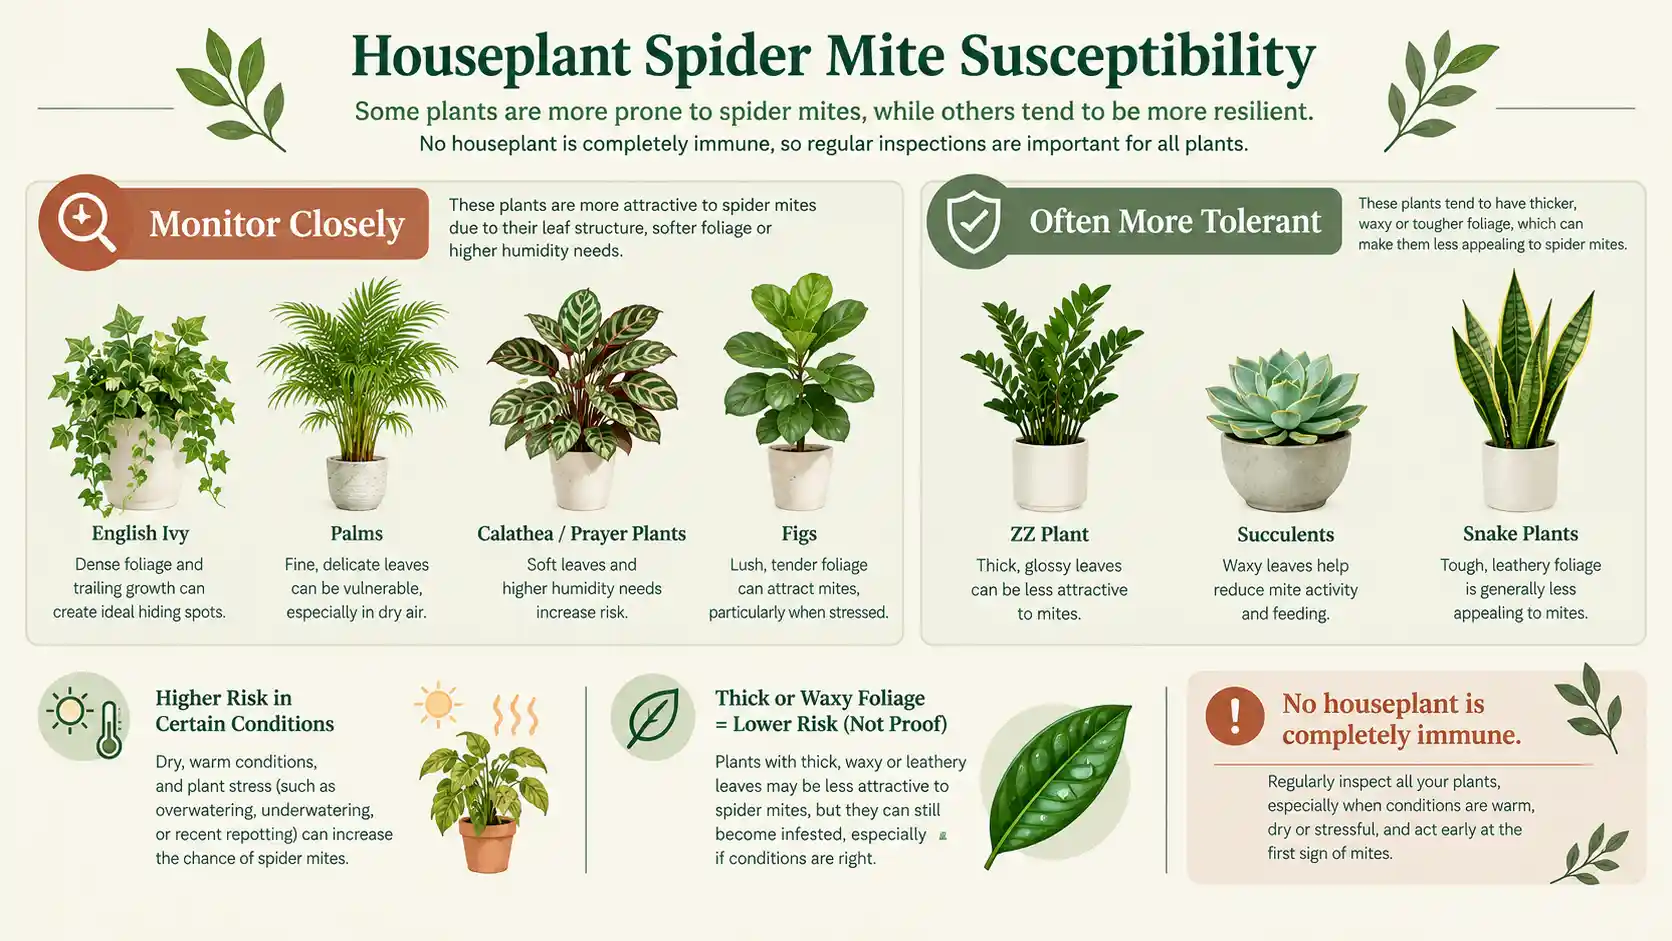
No houseplant is completely immune to spider mites. The two-spotted spider mite has a broad host range, and extension guidance notes that very few indoor plants can be considered fully protected from attack. The useful distinction is therefore higher-risk versus lower-risk, not “susceptible versus immune.”
High-Risk Houseplants
Plants that deserve particularly frequent inspection include:
- English ivy and other ivies
- Palms, including common indoor palms
- Figs and some other broad-leaved ornamentals
- Calatheas and related prayer plants
- Other plants producing soft, lush new foliage under warm, dry indoor conditions
Extension sources specifically identify ivy and several ornamental crops as highly susceptible, while palms are recognised as recurring spider-mite hosts. North Carolina Extension plant profiles for several calathea and Goeppertia species also advise monitoring for spider mites.
Greenery Nest’s Variegated Algerian Ivy care guide and Alocasia Amazonica indoor care guide are useful plant-specific references when these plants are part of your collection.
Naturally Resistant Houseplants
Some houseplants are less likely to become serious spider-mite problems in ordinary indoor conditions, especially drought-adapted plants with tough or waxy foliage.
Examples include:
- ZZ plant
- Many succulents
- Some snake plants
- Other plants with firm, water-conserving foliage
But “resistant” should not be interpreted as “impossible to infest.” Spider mites are broad-host-range pests, and plant stress can change the risk. A tough-leaved plant can still develop mites when conditions are favourable.
Leaf thickness alone is also not a reliable biological rule that a mite cannot pierce the tissue. The safer practical conclusion is that plant texture and water-stress tolerance influence how quickly damage becomes obvious and how well the plant tolerates the infestation, not that thick leaves provide absolute protection.
Our Zamioculcas Zamiifolia Care Guide provides a useful reference for one of the tougher indoor foliage plants.
How to Get Rid of Spider Mites: The Full Treatment Protocol
The most reliable approach is a sequence, not a single spray:
- isolate the plant;
- physically remove mites and webbing;
- apply a properly labelled treatment with complete coverage;
- repeat on a schedule that catches mites emerging after the first application;
- monitor neighbouring plants at the same time.
This matters because many contact treatments only kill mites that are actually reached by the spray. The underside of the leaf is therefore not optional. It is one of the main places the pest lives and feeds.
Step 1: Isolate the Plant
Move the affected plant away from the rest of the collection immediately.
Do not put it in a crowded “sick plant” corner touching other pots. Give it enough space that foliage cannot overlap. Inspect the plants that were closest to it, because a heavily infested houseplant can become a source for new infestations.
Check plants on both sides, above and below the original location. Iowa State Extension recommends determining the extent of an infestation before deciding how aggressively to treat or discard the plant.
Step 2: Rinse and Physically Remove Mites
Take a suitable plant to a sink, bath or shower and use a firm but plant-safe stream of water to dislodge mites from both sides of the foliage.
This step removes mites, eggs and webbing mechanically, but it should be viewed as knockdown, not guaranteed eradication. NPIC specifically recommends forceful spraying for low-level spider mite infestations, and Iowa State Extension also recommends washing or syringing foliage.
The water-spray nuance matters: plain water is a particularly established mechanical tactic for aphids, because dislodged aphids often cannot return to the plant. Spider mites can also be reduced by forceful washing, but an established infestation usually needs repeated washing and/or another control method.
In other words, do not make “I sprayed it with water once” your definition of treatment completed.
Step 3: Apply Neem Oil or Insecticidal Soap
For an established houseplant infestation, use a product specifically labelled for the pest and the plant being treated.
Extension guidance supports insecticidal soaps and horticultural or neem-derived oils for spider-mite management. Mississippi State Extension specifically describes horticultural oil, neem oil and insecticidal soap as effective homeowner options when applied thoroughly to leaf undersides, with repeat treatments needed.
The key word is coverage. A spray that wets only the tops of the leaves can leave a functioning population untouched underneath.
Do not substitute ordinary dishwashing liquid for a commercial insecticidal soap. Household detergents can injure foliage, and Iowa State Extension specifically warns against using ordinary dishwashing detergent as a replacement.
Also check for phytotoxicity. Some plants, including certain palms, ivy, delicate ferns, jade and other sensitive species, can react badly to insecticidal soap under the wrong conditions. A small test area is safer than treating an entire collection without checking the label and plant sensitivity.
The Life-Cycle-Based Treatment Calendar
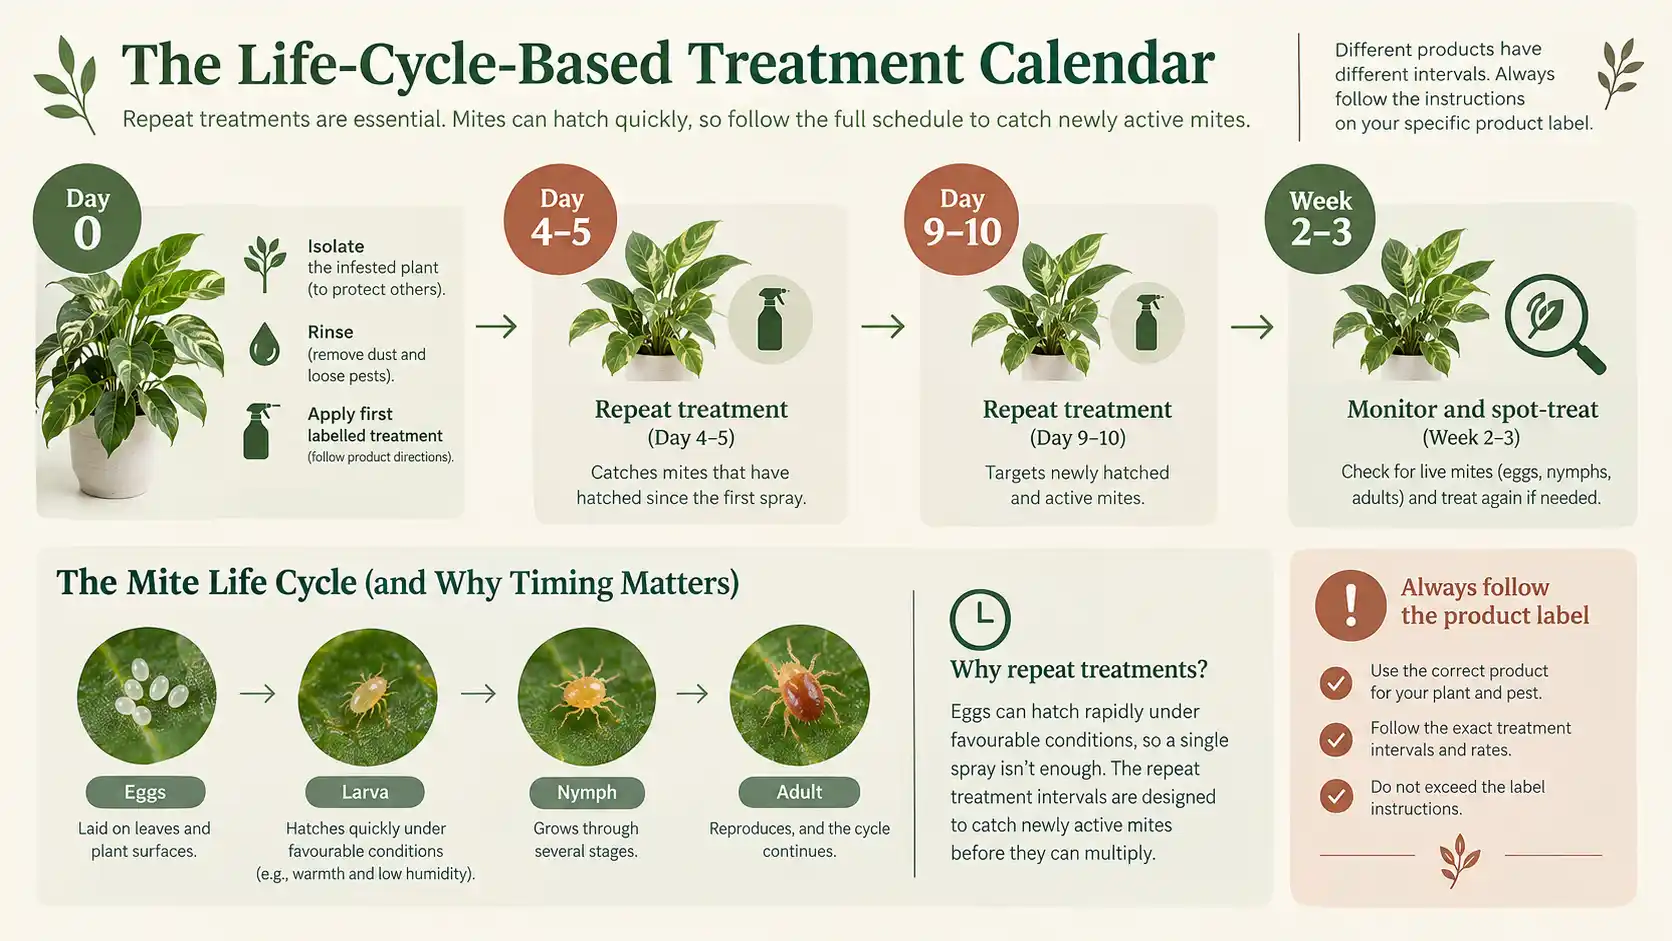
The point of the calendar is not that every spider mite population obeys one exact timetable. Temperature changes development, and products differ in what life stages they affect. Instead, this is a practical minimum home-treatment framework based on the rapid reproductive cycle of the two-spotted spider mite and extension recommendations for repeat sprays.
| Timing | Action | Why |
| Day 0 | Isolate, rinse thoroughly, then apply the first labelled treatment | Reduces active mites and removes webbing; starts the control cycle |
| Day 4–5 | Second treatment | Catches mites that emerged after the first application |
| Day 9–10 | Third treatment | Covers another wave of newly active mites |
| Week 2–3 | Monitor closely and spot-treat if live mites are detected | Confirms that reproduction has actually been interrupted |
Two-spotted spider mite eggs can hatch in as few as about three days at favourable temperatures, and development from egg to adult may be as short as seven days under warm conditions. That is why “spray once and wait” is unreliable. Mississippi State Extension specifically recommends two to three treatments at five-day intervals for houseplant spider mites.
Do not interpret the calendar as permission to apply a product more frequently than its label allows. If the label specifies a longer interval, the label controls.
The visual damage may also lag behind pest control. A leaf that was heavily stippled before treatment will not become green again just because the mites are gone. Judge success by the disappearance of live mites and new damage, not by whether old stippling disappears.
Why Spider Mites Keep Coming Back
Reinfestation usually falls into one of three categories.
Missed life stages: eggs or mites survive because the first treatment did not contact them, then the population rebuilds.
Untreated neighbouring plants: one plant improves while another remains a reservoir.
Resistance or poor product performance: the same active ingredient is repeatedly used against a population that is not responding.
Spider mites are unusually capable of developing pesticide resistance. Extension guidance recommends rotating miticides with different modes of action rather than repeatedly using the same chemistry.
For a chronic infestation, do not assume that changing brands automatically means you have rotated products. Check the active ingredient and, where applicable, the IRAC mode-of-action group. Use only products that are legally available and labelled for your particular plant and pest.
For home growers, also remember that neem oil, horticultural oils and insecticidal soaps are primarily contact treatments. They are not a substitute for thorough application and monitoring.
Is Neem Oil or Insecticidal Soap Safe Around Pets and Kids?
“Natural” does not mean “risk-free.” Neem products differ in formulation, concentration and label directions, and insecticidal soaps are still pesticides.
Before spraying:
- remove children, pets, toys, food bowls and other unnecessary objects from the area;
- follow the product label exactly;
- provide ventilation when the product instructions call for it;
- keep children and pets away while the treatment is being applied;
- keep them away until the product has dried, or for the longer period specified on the label.
The US EPA gives these precautions for pesticide applications generally, while NPIC advises keeping pets away from treated areas until the pesticide is completely dry and the area is well ventilated, subject to the product label.
Do not assume that because a product contains neem it can safely be applied at any concentration or around any animal. Read the actual label for the formulation you have. The NPIC neem oil fact sheet also recommends following label instructions and minimising exposure.
When Is a Plant Too Far Gone to Save? (Save-or-Toss Decision Framework)
There is no well-supported universal rule saying that a spider-mite plant should be discarded once, for example, 50% or 75% of its leaves are damaged. Extension guidance instead uses the broader concepts of severity, plant value, remaining viable growth and spread risk.
A practical cutoff is:
Keep treating when the plant still has a viable growing point or healthy stem tissue, some functioning foliage remains, and the number of live mites is falling after treatment.
Discard when the plant is heavily infested and badly damaged, especially when there is no useful growing point or the plant continues to act as a mite source despite a properly executed treatment cycle.
That decision is supported by NPIC, Iowa State and UC IPM, all of which advise discarding heavily infested plants when continued treatment is unlikely to justify the risk of spreading mites to other plants.
For a rare or sentimental plant, propagation may change the calculation: preserving a healthy cutting from clean tissue can sometimes be more sensible than trying to rehabilitate a severely infested parent plant.
Do Spider Mites Spread to Humans or Other Household Pests?
No. Plant-feeding spider mites are plant pests; they do not establish on humans or pets as a parasitic infestation.
The important qualification is that “mites” is a very broad group. Some other mite species can bite people or infest animals, so claims about all mites should not be transferred to spider mites. Plant-feeding spider mites are recognised by their feeding damage on plants and, at higher populations, their characteristic webbing.
So a spider mite outbreak is a household plant-health problem, not a human or pet infestation.
How Long Does Full Eradication Actually Take?
Allow about 2–4 weeks to confirm a clean-out, depending on how severe the infestation is, how thoroughly every treatment reaches the plant and whether other plants are also infested.
The initial three-treatment sequence can be completed in roughly 10 days, but that is not the same as proving eradication. Continue checking the undersides of leaves and new growth through weeks two and three, and extend monitoring when live mites are still found. Spider mite development can be extremely rapid under warm conditions, so a few mite-free days immediately after spraying are not enough evidence on their own.
Also separate pest recovery from leaf recovery. Old stippled or bronzed leaves may remain damaged permanently even when the infestation has been eliminated. New, healthy growth is one of the better signs that the plant is recovering.
Preventing Spider Mites From Coming Back
Prevention is mostly about removing the conditions that let a small population become a large one.
Keep plants appropriately hydrated without overwatering, inspect both sides of leaves regularly, reduce heavy dust accumulation, and avoid chronic plant stress. Spider mites are associated with dry conditions and water-stressed plants, while excessive fertilisation can create lush growth that is more favourable to mite development.
Quarantine new plants before placing them among an established collection. A practical home minimum is 1–2 weeks of separation with repeated inspection, extended when symptoms appear. This is not a guarantee that a plant is pest-free, but it gives you a chance to catch obvious problems before they move through the collection.
During dry winter periods, inspect especially carefully around heaters and warm air outlets. In humid Australian regions, do not assume high room humidity makes plants immune; species, plant stress and local microclimate still matter.
Regular leaf cleaning also helps you spot the first signs early. Our How to Clean Plant Leaves for Healthy Houseplants can be used alongside your inspection routine.
For broader indoor plant-care fundamentals, see our Plants: Benefits and Guides.
Common Mistakes That Make Spider Mite Infestations Worse
Stopping after one application.
Why it fails: newly emerged mites can survive the first treatment cycle.
Fix: use a properly spaced repeat schedule and keep monitoring.
Prevention: record treatment dates instead of relying on memory.
Relying only on a water spray.
Why it fails: water can dislodge mites without proving that every life stage has been eliminated.
Fix: use washing as mechanical control, then follow the product-labelled treatment programme when necessary.
Prevention: regard rinsing as one step, not the entire protocol.
Skipping quarantine of new plants.
Why it fails: an apparently healthy new plant can introduce pests into an established collection.
Fix: keep newcomers separate and inspect undersides and growing points.
Prevention: make quarantine part of the normal plant-buying routine.
Missing leaf undersides during treatment.
Why it fails: spider mites commonly occupy the lower leaf surface.
Fix: turn leaves over and ensure the labelled treatment reaches both surfaces.
Prevention: make underside inspection part of every pest check.
Conclusion
Spider mites on houseplants are easiest to defeat when you treat the problem as a diagnosis-and-life-cycle problem, not simply a spraying problem. Start with the combination of stippling, fine webbing and the white-paper shake test. Rule out thrips, mealybugs and physiological damage before choosing a treatment.
Once spider mites are confirmed, isolate the plant, physically rinse away mites and webbing, then use a suitable labelled treatment with thorough coverage of the leaf undersides. Repeat at the correct interval rather than stopping after one application, and keep monitoring for at least the next two to three weeks.
The final goal is not merely a plant that looks better today. It is a plant with no active mite population, healthy new growth and no untreated neighbouring reservoir.
Frequently Asked Questions
How do I know if it’s spider mites and not thrips or mealybugs?
Look for the combination of fine stippling, possible bronzing, fine silk webbing and tiny moving mites on a white-paper shake test. Thrips more often cause silvery streaking and dark frass, while mealybugs produce visible white cottony clusters.
Why do spider mites keep coming back after treatment?
The most common reasons are missed eggs or mites, inconsistent treatment intervals, untreated neighbouring plants and repeated use of a product to which the population has reduced sensitivity. Thorough coverage and appropriately spaced repeat applications are essential, and chronic problems may require rotation between different labelled modes of action.
Are neem oil and insecticidal soap safe around pets and children?
They can be used safely only when the particular product is used according to its label. Remove children and pets during application and keep them away until the treatment has dried or the label requires a longer exclusion period. Ventilate indoor treatment areas where appropriate.
Can spider mites spread to humans or other pests in the house?
Plant-feeding spider mites do not establish on humans or pets. They can, however, spread from plant to plant, especially when foliage is touching or infested plants are moved around the home. Other mite groups have different biology, so not every “mite” behaves like a spider mite.
How long does it actually take to get rid of spider mites?
The active treatment phase can take around 10 days when three applications are appropriately spaced, but allow 2–4 weeks of monitoring before declaring the infestation eliminated. Old leaf damage may remain even after the mites are gone.
Which houseplants are most likely to get spider mites?
Ivy, palms, figs and several other ornamentals are well-recognised hosts, while several calatheas and prayer plants should also be monitored. Dry, warm and stressed indoor conditions increase the risk.
At what point should I throw away an infested plant instead of treating it?
There is no scientifically supported universal leaf-damage percentage that determines the decision. The practical cutoff is whether the plant is heavily infested and badly damaged, whether viable healthy growth remains, whether the mite population is declining after proper treatment, and whether keeping the plant risks spreading the infestation to healthier plants.



One Response